Bearded Dragon Setup Guide – What You Actually Need
Most starter kits sold for bearded dragons contain at least one item that will harm the animal over time. The coil UVB bulb in those all-in-one boxes cannot prevent bone disease at normal basking height. The sand substrate causes impaction. The enclosure is too small for an adult by the time they hit 12 months.
Getting the bearded dragon setup right from the beginning costs more upfront and pays back through vet bills avoided and an animal that actually thrives.
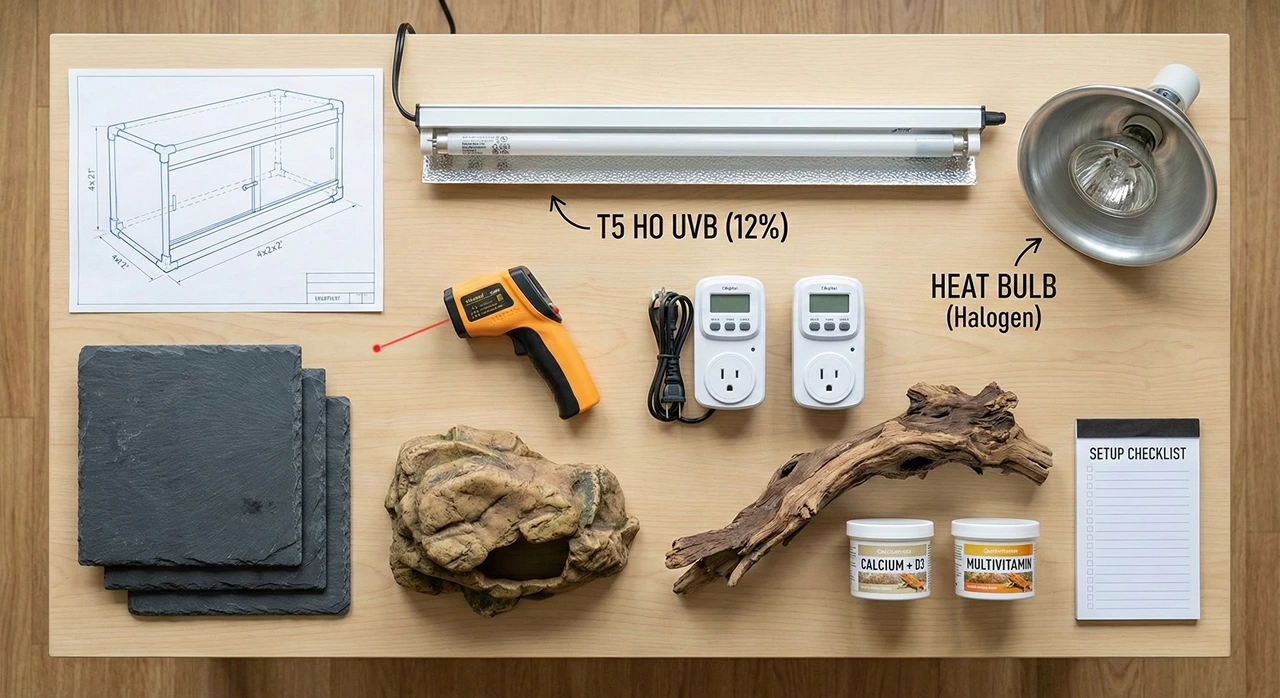
A correct bearded dragon setup genuinely needs six things: an enclosure large enough to create a real temperature gradient, a T5 HO UVB tube, a basking bulb, a way to measure temperatures accurately, a safe substrate, and a water bowl. Everything else is conditional.
Knowing what to skip matters as much as knowing what to buy, and running the full setup for seven days before your dragon arrives makes more difference than most beginners realise.
Start With the Right Enclosure Size
Why 40 Gallons Is Too Small
The enclosure is your dragon’s entire world, and getting the size wrong affects everything downstream. Heat gradients, lighting distances, behaviour, and stress levels all depend on having enough floor space to create a real temperature difference between ends.
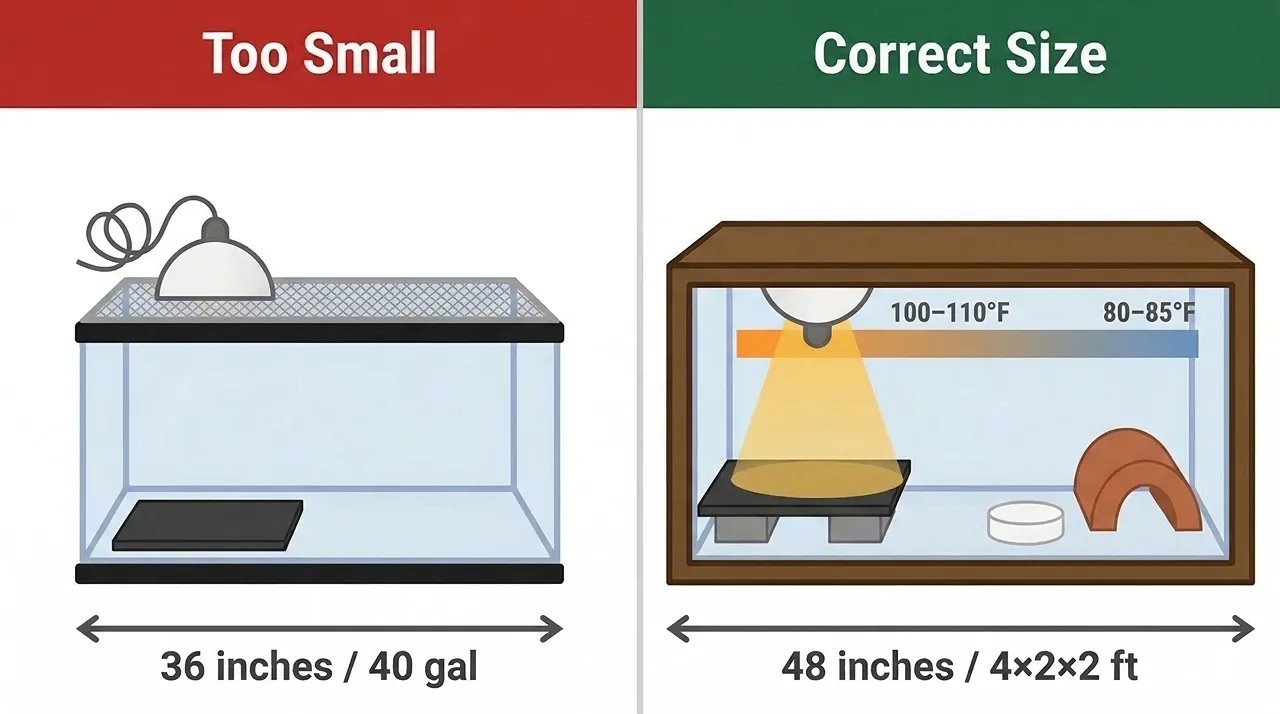
The most common and most costly mistake new owners make is buying a 40-gallon aquarium.
A standard 40-gallon tank runs 36 inches long. An adult bearded dragon commonly reaches 22 to 24 inches in total length, which means they physically cannot turn around without pressing against the glass.
A small enclosure also traps heat from the basking lamp and raises the overall internal temperature, making a functional cool side impossible to maintain. Why the numbers consistently fail is explained in full in the tank size breakdown.
The enclosure you need measures 4 x 2 x 2 feet (120 x 60 x 60 cm). That 48-inch floor gives enough distance to hold a genuine 20-degree drop between the hot end and the cool end.
A juvenile in a correctly sized adult enclosure will not get lost in the space. Fill it with hides and branches and they will use every inch of it. Most dragons finish growing around 12 to 18 months, as the size-by-age growth chart shows, and by that point they need every inch of a 4-foot floor.
| Enclosure Size | Suitable For | Problem |
|---|---|---|
| 40 gallon (36″x18″x18″) | Hatchlings under 4 months | No real gradient. Adult cannot turn around. |
| 75 gallon (48″x18″x21″) | Temporary juvenile step-up | Still only 18″ wide. Same gradient problem. |
| 4x2x2 (120 gallon) | Permanent adult setup | None. Buy this first. |
| 5x2x2 or 4x2x4 | Ideal if you have the space | None. More is always better. |
Buying a 4x2x2 as your first and only enclosure is the right decision for nearly every owner. The temptation to start smaller and upgrade later is understandable, but moving an established animal into new hardware midway through their growth disrupts their routine, stresses them out, and costs more in total than buying the right size once.
Why Most Glass Aquariums Cause Problems
Glass aquariums seem like an obvious choice and are almost never the right one. Glass leaks heat quickly, making it hard to hold temperatures in cooler rooms and driving up electricity costs. PVC and melamine hold heat considerably better.
Glass is also reflective, and dragons frequently see their own reflection and interpret it as a rival, triggering glass surfing and beard-darkening that solid-walled enclosures eliminate entirely.
Glass fish tanks open from the top. To a lizard hardwired to watch for aerial predators, a hand coming from above is a threat signal. Front-opening enclosures mean your hand comes in at eye level, and the difference in how quickly a dragon tames is noticeable.
Look for 4x2x2 PVC enclosures from Dubia.com, Zen Habitats, or Toad Ranch. They are lightweight, built for T5 HO lighting without modification, and hold temperature well in most rooms.
Light interior walls, white melamine in particular, reflect heat and UV light back into the enclosure so your equipment works harder without additional cost. Adequate airflow matters too. Stagnant air inside any enclosure raises humidity, and high humidity in a bearded dragon setup is a direct path to respiratory problems.
Wrong UVB Is the Most Expensive Mistake
UVB lighting allows your dragon to synthesise vitamin D3, which makes calcium absorption possible. Feed the best diet available, dust every insect with calcium powder, and your dragon will still develop metabolic bone disease if the UVB component is wrong.
It is a slow failure. Nothing looks visibly wrong for months, and by the time soft bones and deformities appear, the damage has been accumulating for a long time.
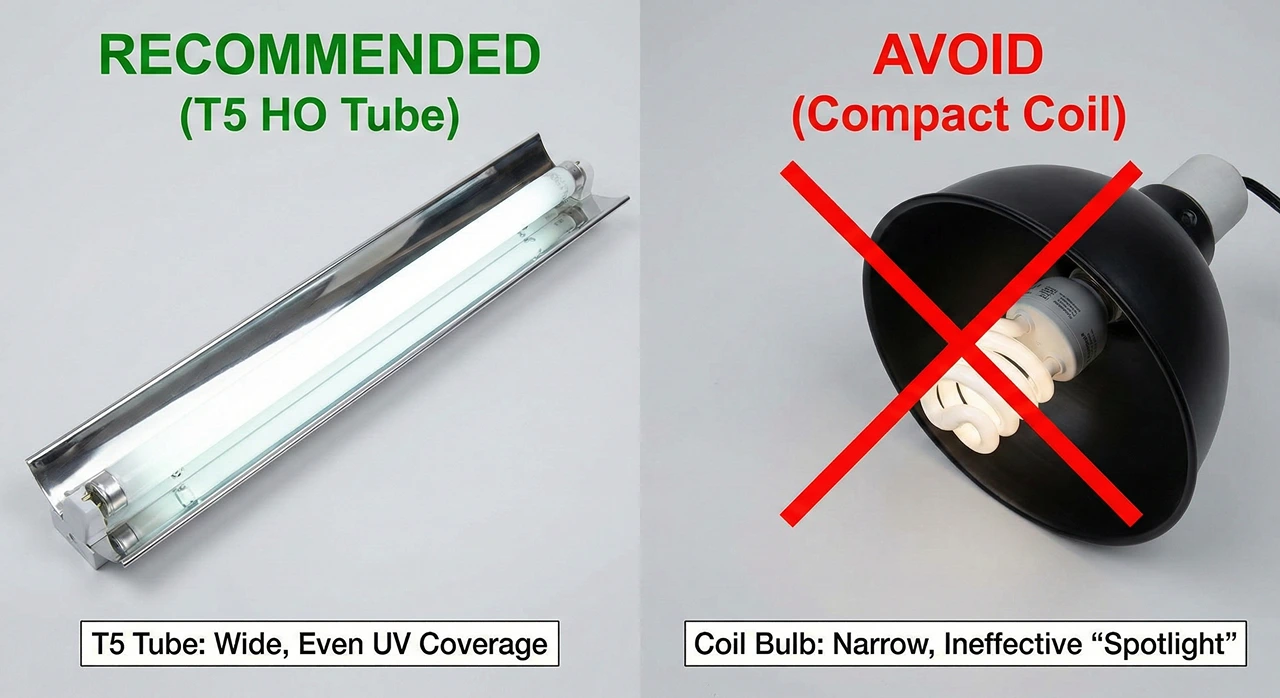
Why Coil Bulbs Fail Every Time
Coil and compact UVB bulbs cannot output enough UV to replicate what a bearded dragon needs. Their output drops off sharply within a few inches and degrades unpredictably over time. The measured difference between the two formats is hard to argue with once you have seen the numbers.
The correct option is a T5 HO linear fluorescent tube. The Arcadia Dragon 12% and the Zoo Med ReptiSun 10.0 T5 HO are the only two brands with consistent output that actually lasts 12 months.
The fixture must have a curved, shiny metal reflector behind the tube. Without it, roughly half the UV output goes upward into the hood and is wasted.
Mount the tube starting from the warm end of the enclosure, not centrally. This creates a UV gradient from the hot side toward the cool side, giving your dragon a range of UVI levels to move between throughout the day.
A dragon that can choose its UV exposure self-regulates in a way a centrally mounted tube never allows.
Most Keepers Never Check the UVI
The target UVI at basking height, 12 to 15 inches below the tube, is 4.0 to 6.0. This is Ferguson Zone 3, the UV exposure range bearded dragons occupy during active daylight hours in the wild.
A UVI meter costs $70 to $90 and gives you a definitive confirmation your setup is hitting the right number. Most owners skip this step and run on faith that the tube is doing its job, which is exactly how a failing bulb goes undetected for months.
A full walkthrough of how to measure UVI and what to adjust if the reading falls short is in the lighting setup guide.
Replace the UVB tube every 12 months regardless of whether it still produces visible light. UV output drops well before the bulb visibly dims. Write the installation date on a piece of tape stuck to the fixture and replace it on schedule, not when it looks like it might need replacing.
Set the Timer and Leave It Alone
UVB and basking heat run on the same schedule: 12 to 14 hours during summer months, 10 to 12 hours in winter. A basic plug-in outlet timer handles this without any daily effort. Both go off at night.
The temperature drop that follows is natural and healthy. It mirrors the dramatic overnight cooling bearded dragons evolved through across the Australian interior, and it gives the animal’s metabolism a proper rest cycle.
The shorter winter photoperiod is what triggers natural brumation behaviour in dragons that go through a seasonal slowdown. Running summer-length days year-round can suppress this cycle and occasionally produces a restless, confused dragon in autumn that glass surfs for weeks without any enclosure problem causing it.
The Basking Bulb Setup Is Simple
A basking bulb produces a concentrated heat source your dragon can move toward and away from throughout the day. It does not need to be a branded reptile product.
A standard halogen flood light (PAR38) from a hardware store works better than most purpose-sold reptile basking bulbs and costs a fraction of the price. Use 75W if your room stays above 70°F and 100W if ambient temperature runs cooler.
Halogens produce Infrared-A, a wavelength of heat that penetrates into muscle tissue the way sunlight does. A dragon sitting under one will visibly relax in a way they simply do not under a standard incandescent.
The basking surface temperature for an adult dragon should hold between 100 and 110°F (38 to 43°C). Juveniles under six months benefit from a slightly hotter spot, around 110 to 115°F (43 to 46°C).
Mount the bulb in a dome reflector fitting directly above the basking platform and adjust height until the surface reads correctly. Getting the hot end temperature dialled in usually comes down to bulb wattage and dome height working together.
Measure Two Temperatures, Not One
Every bearded dragon setup needs two separate readings: the basking surface temperature and the cool-end ambient air temperature. Most beginners measure one and assume the other is fine. Both matter, and they fail in different ways.
Surface Temperature Is What Actually Matters
Stick-on analogue thermometers come in most starter kits and are routinely inaccurate by 15 to 20°F. Running a tank you believe is at 105°F on the basking rock when an infrared gun shows 88°F is a common early mistake.
At that surface temperature a dragon cannot properly digest food, immune function drops, and within weeks you are at the vet wondering why they stopped eating.
A digital infrared temperature gun costs $15 to $25 and gives you an instant, accurate surface reading. Point it directly at the basking rock, not the air above it.
Air temperature 6 inches above that surface can read 10 to 15 degrees cooler than the surface itself, which means a thermometer dangling near the lamp fixture tells you almost nothing useful. Switching to digital and infrared thermometers is one of the cheapest and most consequential changes a new owner can make.

Cool-end ambient temperature should hold at 80 to 85°F (27 to 29°C) during daytime hours. At night it can drop as low as 65°F (18°C) without any intervention.
Most centrally heated homes do not need overnight heating at all, but running the setup for a full week before the dragon arrives will tell you definitively whether yours does.
Pulse Thermostats Are for Ceramics Only
Two thermostat types are relevant to this setup, and using the wrong one causes real problems. A dimming thermostat gradually raises or lowers power output to hold a target temperature. For basking bulbs and halogen floods, steady unflickering output is what you need, and a dimmer thermostat delivers it.
A pulse thermostat sends bursts of power as temperature drops, which is right for ceramic heat emitters but causes visible flickering in light-emitting bulbs and shortens their lifespan.
For most setups, a dimmer thermostat on the basking bulb circuit is the right choice. Pulse thermostats are for ceramic-only overnight heating circuits, nothing else.
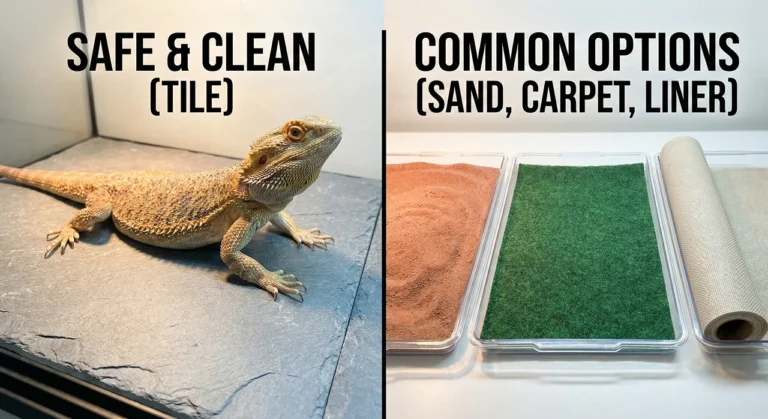
What to Put on the Floor
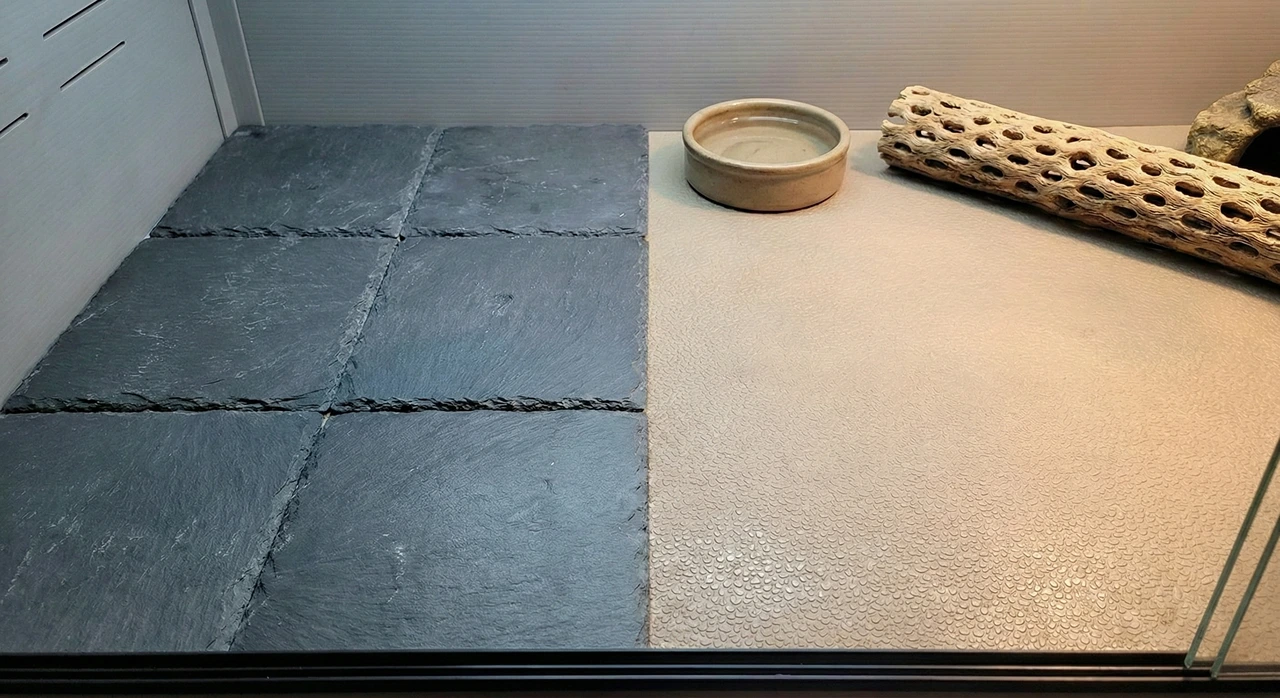
Slate tile, ceramic tile, and textured vinyl reptile matting are the safest substrate options for most bearded dragon setups. Slate and ceramic retain warmth from the basking lamp through the afternoon, clean easily with a damp cloth, and carry no impaction risk.
Slate also passively files down nails during normal movement, which reduces how often you need to trim them.
Start With Slate Tile or Shelf Liner
Slate or ceramic tile is the first choice for most experienced keepers. Cut it to fit the enclosure floor and it never needs replacing, just periodic disinfecting.
Non-adhesive shelf liner is a cheap, wipeable alternative available in any colour. It does not hold heat as well as tile but is perfectly safe and practical, particularly for baby dragons.
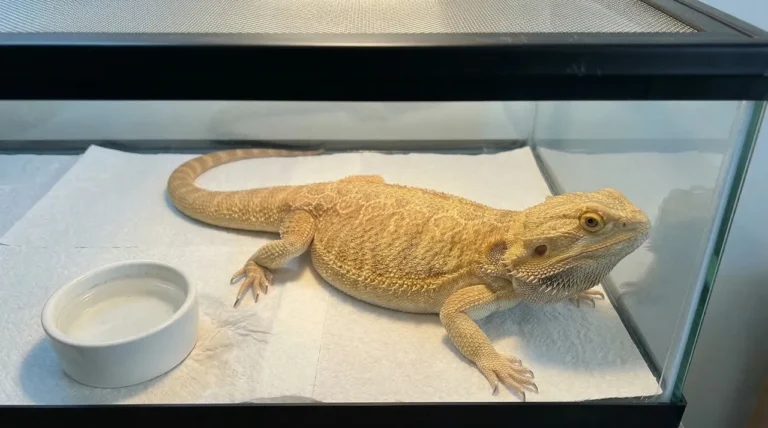
Paper towel is the right choice for a sick or recovering animal. It is completely sterile and lets you monitor every dropping clearly, which matters when you are tracking health.
When you are ready to move beyond these basics, knowing when bioactive loose blends are genuinely safe is worth reading before committing.
Sand and These Substrates Are Not Safe
Calcium sand is marketed as digestible. It is not. Calcium carbonate neutralises stomach acid and can set into a dense blockage in the intestines, a medical emergency that frequently requires surgery.
The signs of bearded dragon impaction often develop slowly and are well advanced by the time a dragon shows obvious distress.
Walnut shell substrate contains sharp fragments that can lacerate the digestive tract if swallowed. Reptile carpet harbours bacteria in the fibres, cannot be properly disinfected, and catches dragon nails during normal movement, ripping them out.
None of these substrates offer anything that slate tile does not provide more safely and for less money.
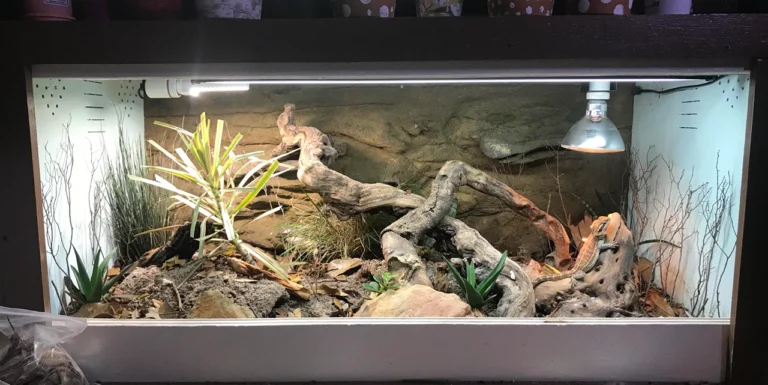
Decor That Actually Does a Job
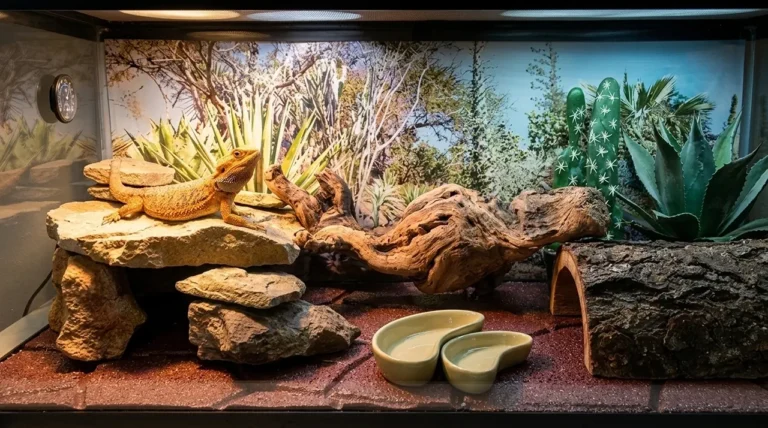
Every piece of decor should earn its place. The basking platform goes directly under the basking bulb and needs to be large enough for your dragon to sprawl across fully.
Use a large, flat piece of natural slate or dense stone. Stone absorbs heat slowly and radiates it upward, warming your dragon’s belly while the lamp warms them from above. A dragon basking on stone gets heat from two directions simultaneously, which is closer to how basking on a sun-warmed rock face in the wild actually feels.
Which materials hold heat well and which do not is worth checking in the safe rocks and wood guide before you buy anything from outside.
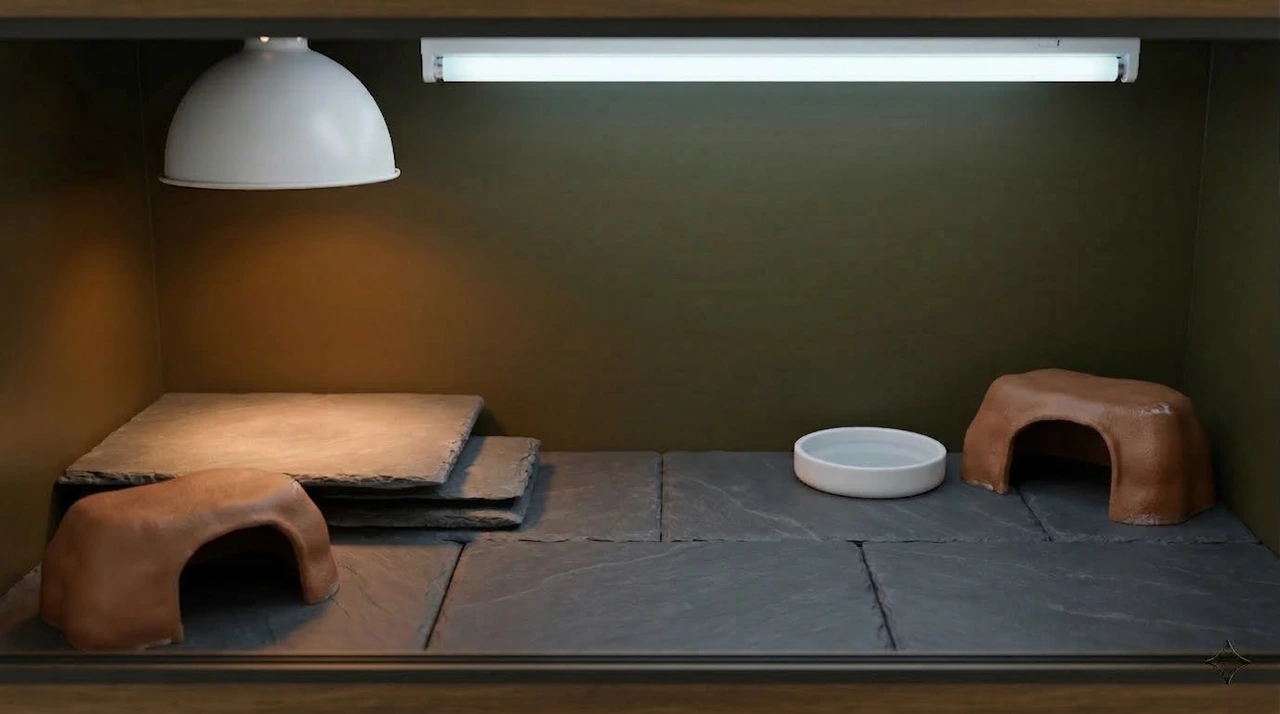
Two Hides Are the Minimum
One hide on the hot side. One on the cool side. Your dragon needs the option to feel hidden and secure at any temperature.
If the only hide is at one end, they will camp there even when the temperature is wrong for what their body needs at that moment. A hammock strung between the two sides gives most dragons a third resting position they use regularly throughout the day.
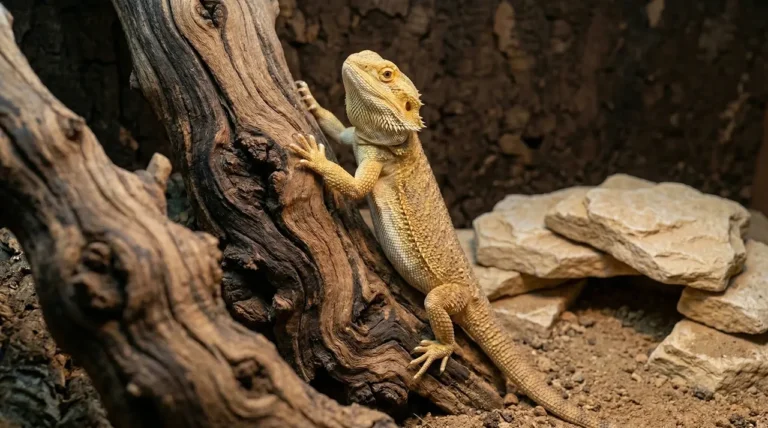
Branches Let Your Dragon Regulate UV
A branch angled up toward the UVB tube gives your dragon a way to move closer to the light source when they need more UV, and further away when they have had enough.
A dragon on the enclosure floor under a tube receives a very different UVI than one sitting on a branch 8 inches from the lamp. Building in that vertical range lets them self-regulate in a way a flat, empty floor never allows.
Any branches brought in from outside must be treated before going into the enclosure. Sanitising external wood properly prevents mites and bacteria from entering a clean setup, and the wood sanitising process takes less time than most people expect.
Beyond branches, most experienced keepers add one or two additional climbing structures once they have watched how their specific dragon uses the space. The enrichment options that actually get used are a shorter list than the pet shop shelf suggests.
What Supplements a Bearded Dragon Needs
Your UVB tube synthesises D3 when your dragon basks under it correctly. Supplements fill the calcium gap that diet alone cannot close.
The reason D3 is kept out of the daily calcium schedule is overdose risk. A dragon with a correctly working UVB setup is already producing D3, and too much supplemental D3 on top of that causes toxicity.
Get the UVB right first, then treat D3 supplements as a backup rather than a primary source. The schedule that works for most dragons:
- Calcium without D3: dust food four to five times per week for adults, daily for babies and juveniles
- Reptile multivitamin containing vitamins A and E: once per week
- Calcium with D3: once or twice per month if your UVB is correct, more frequently only if your UVB is known to be weak or failing
How the D3 overdose risk plays out in practice, and how the dusting schedule shifts as your dragon ages, is explained in the diet and feeding guide.
Keep a shallow ceramic salad bowl on the cool side so greens stay fresh. Use a water bowl shallow enough that a baby dragon cannot drown in it and change the water daily.
What You Can Safely Skip Buying
Humidity monitors are worth having for awareness, but most homes already sit in the 30 to 40% range that dragons need without any active management.
Heat mats under glass tanks do very little useful thermal work for a species that thermoregulates by basking from above rather than drawing warmth from the ground.
Red or blue night bulbs produce light that disrupts sleep cycles and serve no biological function that a ceramic heat emitter does not handle better in every respect. If your room drops below 65°F overnight, a ceramic heat emitter on a dimmer thermostat is the right fix. What temperature genuinely warrants adding one is covered in the nighttime temperature guide.
Reptile foggers and misting systems are unnecessary in a correctly configured setup and actively harmful in excess. Bearded dragons evolved in one of the driest habitats on earth, and their respiratory systems are not built for sustained high humidity.
A fogger running inside a bearded dragon setup creates warm, moist, stagnant air that is ideal for bacterial growth and the most common cause of respiratory infections in captive bearded dragons. A standard spray bottle used lightly during a shed is all the targeted moisture a bearded dragon ever needs.
Vitamin D3 drops added to drinking water are poorly absorbed and create a false sense of covering a gap that should be filled by a properly functioning UVB tube. Calcium sand costs more than slate tile and causes impaction.
Most owners underestimate the annual running costs of keeping a dragon well once vet visits, UVB replacements, and feeder insects are factored in over a full year. Spending money on ineffective products means less budget available for the equipment that actually works.
Run Everything for Seven Days First
Running the full bearded dragon setup for at least seven days before the dragon arrives is the single most effective habit a first-time keeper can build.
Seven days gives you time to discover that the basking spot is holding at 93°F instead of 105°F, that the cool end climbs past 90°F by mid-afternoon when the sun hits the side of the enclosure, or that the outlet timer fires 20 minutes off schedule. All of these are fixable. They are far harder to fix when a stressed new animal is already in the enclosure while you are troubleshooting them.
The first two weeks in a new enclosure, most dragons refuse food, hide, or glass surf despite a correct setup. This is relocation stress, not a husbandry problem. Keep everything stable, offer food daily without pressure, and most dragons settle within 7 to 14 days.
A dragon arriving into a stable, week-old bearded dragon setup settles faster and starts eating sooner than one dropped into an enclosure still being calibrated.
The Emergency Kit Worth Having Ready
Keep these in a small box before the dragon arrives. Sourcing them at 9pm on a Sunday when you actually need them is not an experience worth having.
- Styptic powder: stops nail bleeding immediately if you clip too short. A small container lasts years.
- Critical Care (Omnivore formula): a recovery powder you mix with water and syringe-feed to a dragon refusing food during illness or recovery. Worth having before you need it.
- Spare basking bulb: halogen floods blow without warning, always at inconvenient times. Keep a backup of the same wattage.
- Spare UVB tube: less urgent than the basking bulb, but a dragon going more than 24 hours without UVB is not ideal. Have one ready if you travel.
This is also the point to identify a reptile-experienced vet in your area before you actually need one. The Association of Reptilian and Amphibian Veterinarians maintains a vet finder tool for locating qualified reptile vets by location. Keep that contact saved before problems arise.
Frequently Asked Questions
How Much Does a Correct Setup Cost
Budget between $350 and $600 for a complete, correctly specced bearded dragon setup. A 4x2x2 PVC enclosure runs $150 to $250, a quality T5 HO fixture with an Arcadia or ReptiSun tube runs $60 to $100, and halogen bulbs, a temp gun, timers, substrate, and decor cover the rest. A $90 starter kit requires replacing most components within months.
Can a Baby Dragon Start in a 4x2x2
Yes. The common advice that large enclosures stress baby dragons is a myth. The issue is empty space, not enclosure size. Fill the space with hides, branches, and decor and a young dragon will use every inch of a 4-foot floor. How to arrange a large enclosure for a hatchling is covered in the baby beardie care guide, including which end to concentrate the furniture on during the first few months.
Does My Dragon Need Heat at Night
Usually not. As long as your room stays above 65°F (18°C), a bearded dragon is fine overnight without supplemental heat. Below that threshold, a ceramic heat emitter on a dimmer thermostat is the right addition. Dragons actually benefit from the temperature drop, which signals their body to slow down and rest properly before the next basking session.
Is Sand Safe as Substrate
Sand carries a real impaction risk, particularly for juveniles and stressed animals that may accidentally swallow substrate while hunting insects. Slate tile, ceramic tile, or paper towel are safer choices for most owners. Experienced keepers sometimes use bioactive loose substrate blends, but that is not the right starting point for a first dragon.
How Often Should I Replace the UVB Tube
Every 12 months, regardless of whether the tube still produces visible light. UV output drops well before the bulb dims. Write the installation date on a piece of tape stuck to the fixture and replace it on schedule.
Your Bearded Dragon Setup Checklist
Once your basking surface reads 105°F, your cool side reads 80 to 85°F, your UVB is mounted correctly, and your timers are set, stop adjusting. Dragons are creatures of routine. An environment that changes every week produces a stressed, unpredictable animal. Get this list right once and leave it alone.
- 4x2x2 feet (120 x 60 x 60 cm) PVC or melamine enclosure, front-opening, positioned away from direct sunlight and cold draughts
- T5 HO UVB tube (Arcadia Dragon 12% or Zoo Med ReptiSun 10.0) with a reflector fixture, mounted starting from the warm end of the enclosure
- UVB tube replaced every 12 months — write the installation date on tape stuck to the fixture before you forget
- Halogen flood bulb (PAR38) 75W or 100W in a dome reflector fitting directly above the basking platform
- Basking surface confirmed at 100 to 110°F for adults, 110 to 115°F for juveniles under six months — measured with an infrared temperature gun pointed at the surface, not the air above it
- Cool-end ambient temperature confirmed at 80 to 85°F during daytime hours
- Two digital outlet timers, one for UVB and one for basking, set to 12 to 14 hours on in summer and 10 to 12 hours in winter
- Substrate in place: slate tile, ceramic tile, or paper towel for a first bearded dragon setup
- Large flat basking platform (natural slate or dense stone) positioned directly under the bulb, wide enough for the dragon to sprawl across fully
- Two hides: one on the hot side, one on the cool side
- Shallow water bowl on the cool end, stable enough not to tip when the dragon climbs in
- Calcium without D3 and a reptile multivitamin sourced and ready before the first feed
- Emergency kit assembled: styptic powder, Critical Care, spare basking bulb, spare UVB tube
- Full setup run for seven continuous days with basking surface and cool-end temperatures logged morning and afternoon
- Reptile-experienced vet identified and contact details saved before the dragon arrives
Written by
Sarah ArdleySarah has kept bearded dragons for over ten years. She founded Beardie Husbandry after discovering that most mainstream care advice — including what she followed with her first dragon — was doing more harm than good. Every article on this site is grounded in veterinary research and real keeper experience.