Bearded Dragon Bioactive Setup for Beginners
Bioactive keeping has gone mainstream, and bearded dragon bioactive setup questions are among the most common searches new owners run into. Most guides, though, were written for tropical species.
Beardies come from arid scrubland and semi-desert in central Australia. The rules for setting one up correctly are fundamentally different from tropical bioactives, and most of the content beginners find does not reflect that.
Get the fundamentals right and the enclosure handles most of its own biological maintenance. Get them wrong and you end up with rotting plants, dead isopods, and humidity levels that cause real health problems.
Is a Bioactive Setup Right for Your Dragon
Not every beardie is a good candidate, and working this out before spending money on substrate and cleanup crew will save you significant frustration. Two factors disqualify most dragons immediately: age and parasite status.
Why Babies Should Not Go in Bioactive
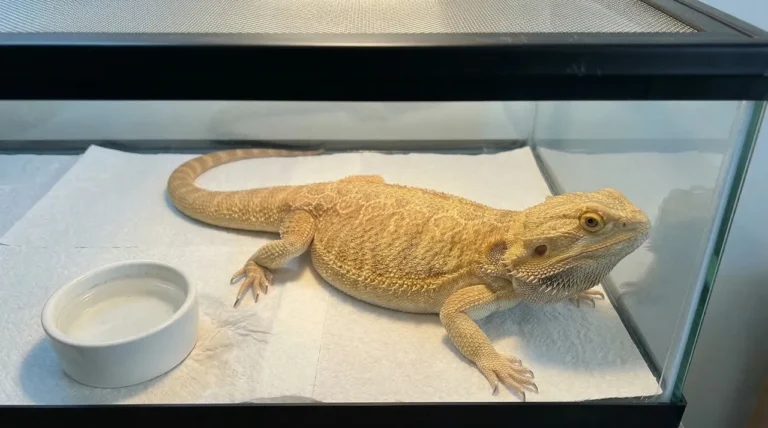
Baby dragons taste and lick everything in their enclosure constantly. Loose substrate in any depth carries real impaction risk during this stage, and the six-inch depth a functional bioactive build requires makes that worse, not better.
Tile, slate, or a reptile mat is the right substrate until your dragon is reliably eating and digesting at six months or older. Juveniles between six and twelve months can go bioactive, but only if they are eating confidently and passing normal stools consistently.
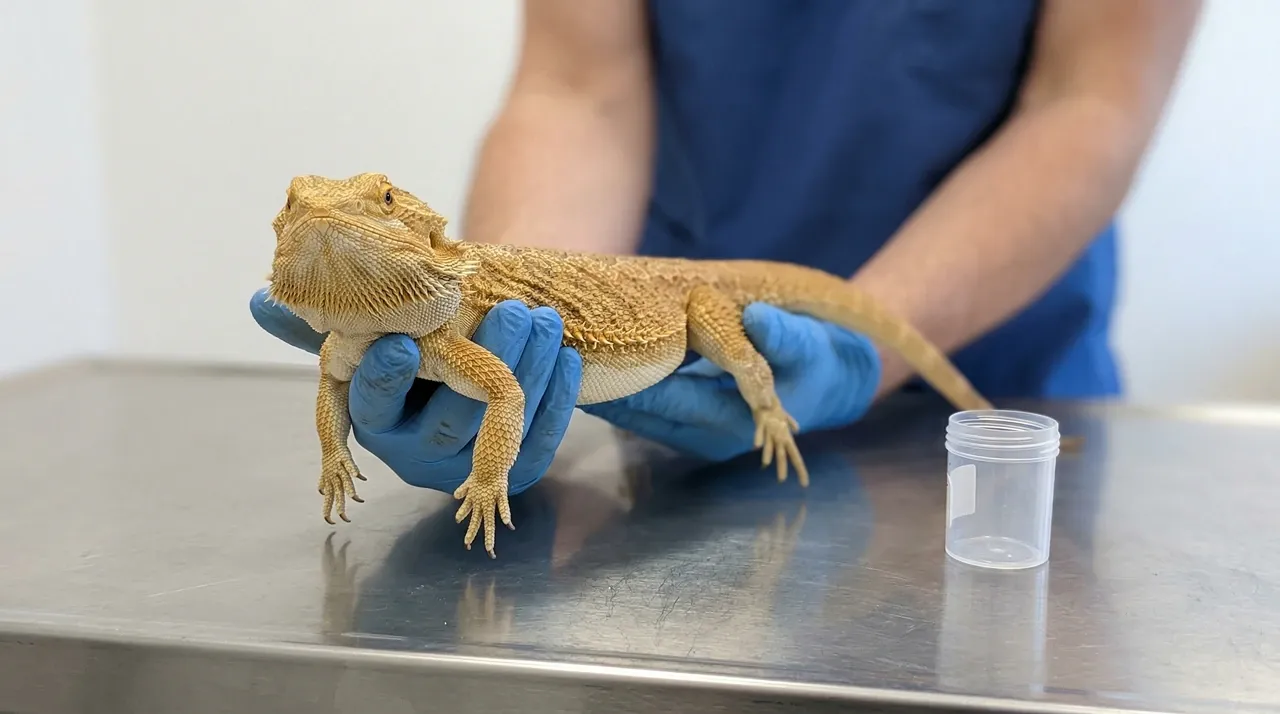
Get a Fecal Test Done First
Pinworms and coccidia are remarkably common in captive bearded dragons. In a tiled setup, manual waste removal breaks the reinfection cycle. In a bioactive enclosure, loose substrate gives those parasites a warm environment where they cycle and multiply far faster.
A dragon carrying a manageable parasite load on tile can develop a serious infection in a bioactive setup within weeks. Before building, get a reptile vet to confirm your dragon’s parasite status is clear. This is not a step you skip.
What Enclosure Size Do You Actually Need
A 4 x 2 x 2 foot enclosure is the genuine minimum. The floor area matters not just for your dragon’s movement but because the substrate depth a functional bioactive build requires needs a large footprint without consuming all usable space.
The minimum tank dimensions that apply to standard beardie keeping are the same starting point here, but bioactive adds a substrate dam requirement. That’s a raised barrier along the base of the front opening that stops substrate spilling out when you access the enclosure. Most purpose-built PVC reptile enclosures include this.
PVC handles moisture better than timber, doesn’t warp when a corner of the substrate is slightly damp, and maintains ambient temperatures more consistently than full-glass builds. Front-opening panels also make maintenance significantly easier than top-opening lids when you’re working over six inches of substrate.
The Substrate Mix Is Everything
This is where most beginners get either vague advice or advice written for a different species. The mix has to satisfy several competing requirements at once:
- Drain freely without compacting into a moisture-retaining block
- Hold burrow structure well enough for your dragon to dig safely
- Support plant roots across the full depth of the substrate layer
- Provide enough organic matter for microfauna to establish and sustain themselves
What Ratio Actually Works
The most reliable mix for a bearded dragon bioactive setup is:
- 60% organic topsoil (no added fertilisers, no perlite, no moisture retention additives)
- 30% washed play sand or pool filter sand (pesticide-free)
- 10% excavator clay
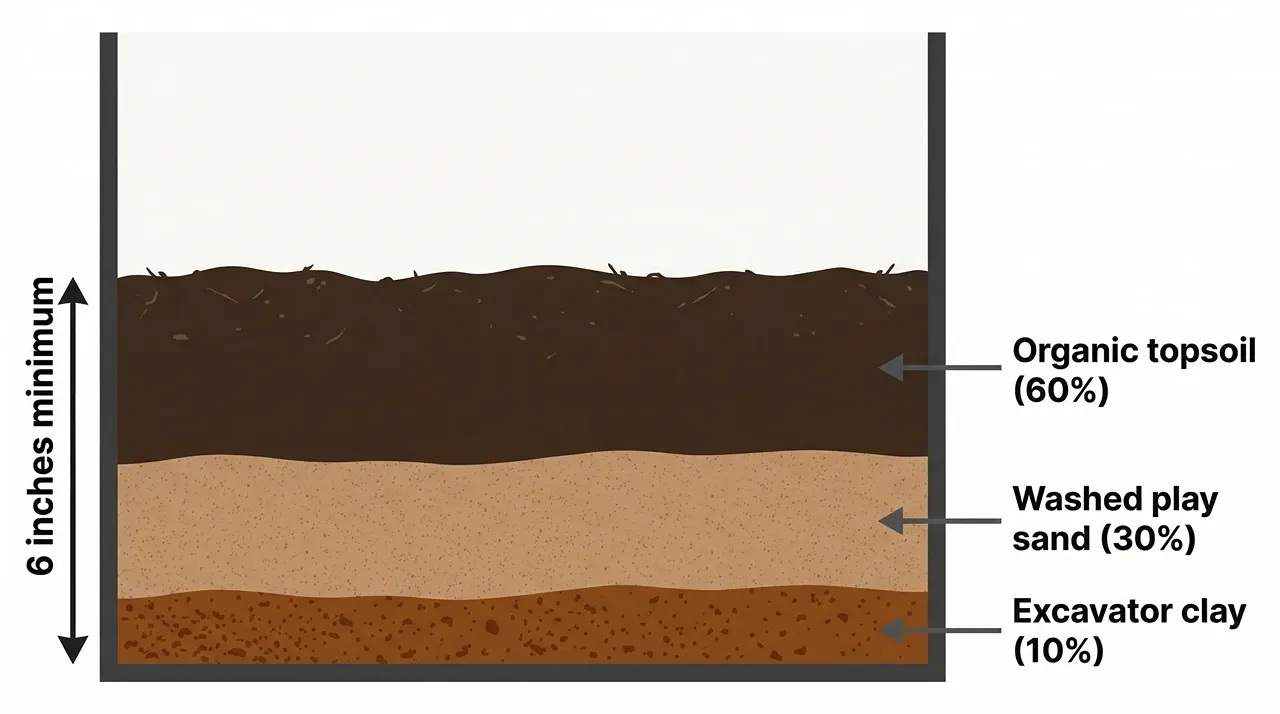
The topsoil provides the organic matter the microfauna need to establish and sustain themselves. The sand improves drainage and mimics the granular, gritty texture beardies encounter in their natural range. The excavator clay binds the mix enough to hold burrow shapes without creating a compactable, moisture-retaining block.
Bake your topsoil at 200°F for 30 minutes before mixing to eliminate pathogens, then let it cool completely before use.
Pre-bagged organic topsoil from a garden centre works fine. Just confirm there are no added wetting agents or slow-release fertilisers. Both show up more often than expected in otherwise plain-looking bag mixes.
How Deep Does It Need to Be
Minimum five inches across the entire floor, with six being meaningfully better for most adults. Less than that and the isopods have nowhere cool to retreat when surface temperatures peak during the basking period.
Plant roots can’t establish properly in shallow substrate, and the mix dries out too fast to support sustained microbial activity. Depth is what makes the biology work. Every inch lost to an unnecessary drainage layer is an inch of functioning ecosystem gone with it.
Do You Need a Drainage Layer
No. Drainage layers exist to prevent waterlogging in enclosures that need regular misting. A correctly managed beardie bioactive should never be wet enough to need one. If your substrate surface feels damp 24 hours after any moisture was added, you have a management problem, not a drainage problem.
The standard substrate options used in non-bioactive setups won’t all translate here. Calcium sand, bark chips, walnut shells, and reptile carpet don’t support microfauna, and several carry real ingestion risks in a deep loose-substrate build.
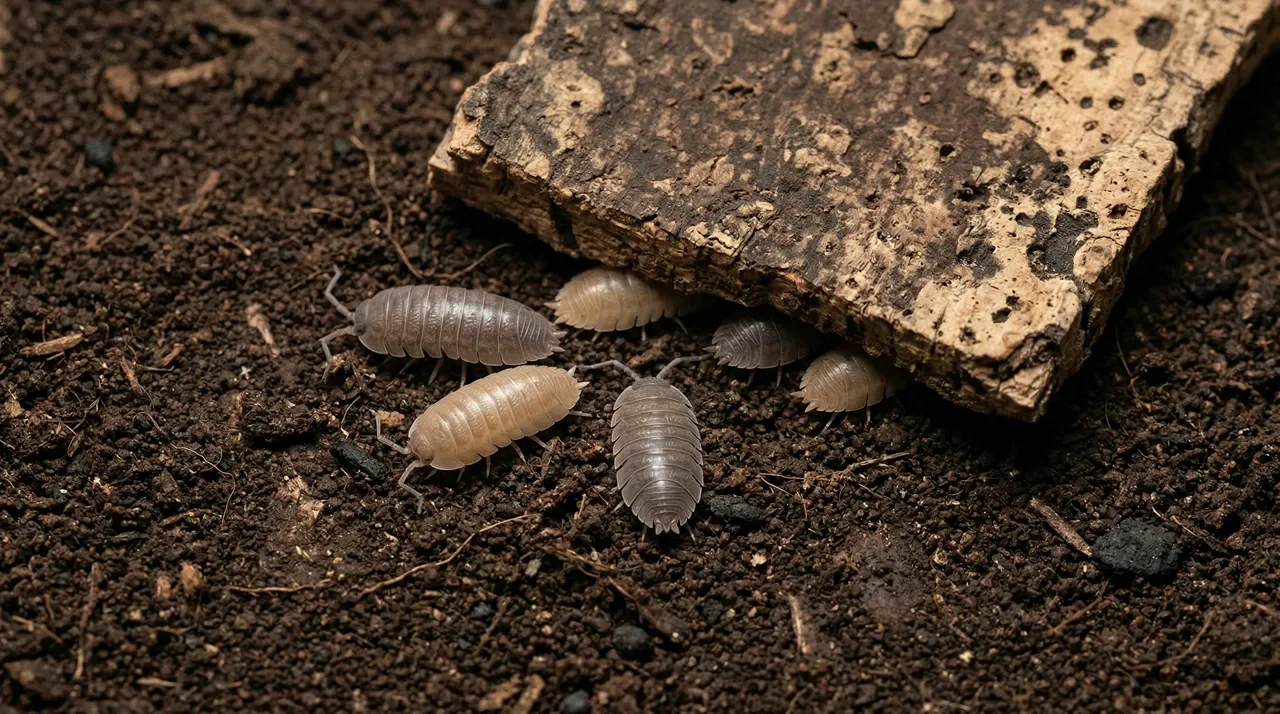
Which Cleanup Crew Works for Arid Beardies
Most bioactive guides say “isopods and springtails” without specifying which species, and that generalisation causes most of the cleanup crew failures beginners experience. Tropical isopod species handle the conditions in a beardie enclosure poorly. You need arid-adapted species.
Isopod Species That Survive Low Humidity
The isopod species that consistently work in arid beardie setups are:
- Porcellio laevis: fast-reproducing, tolerates heat and dry conditions well, handles waste efficiently
- Porcellio haasi: slightly more arid-tolerant than most Porcellio species, handles the warm ambient temperatures a beardie cool-end produces
- Armadillidium nasatum: more tolerant of low humidity than most Armadillidium species; pill-shaped, which means your dragon is unlikely to hunt them actively
Start with at least 100 to 150 individuals, not the starter cultures of 25 to 50 that most suppliers sell. In the first month, expect some die-off while the colony acclimatises. A small starter culture in an adult beardie’s enclosure will not sustain itself.
Why the Cleanup Crew Keeps Dying
The central tension in a beardie bioactive is that your dragon needs 30 to 40% ambient humidity and your cleanup crew needs localised pockets of higher moisture to breed and hydrate. The solution is microclimates, not misting the whole enclosure.
Bury a piece of cork bark in the cool end of the substrate, deep enough that the underside stays slightly damp.
Add a small patch of sphagnum moss in one corner. Not a water dish, but a handful of moss that you mist directly once or twice a week without wetting the open substrate around it. This gives the isopods somewhere to hydrate and breed without pushing ambient humidity into the range that triggers respiratory infections.
Place your digital hygrometer at cool-end substrate level, not mounted on the wall. Ambient wall readings always underrepresent what’s happening at ground level where the isopods actually live.
If it reads consistently above 50% down there, your microclimate management needs adjusting. Accurate enclosure humidity readings matter more in a bioactive than in a standard setup, precisely because you’re managing two distinct environments within the same enclosure.
For springtails, temperate species handle drier conditions better than tropical ones like Folsomia candida. They work primarily on surface mould and microbial breakdown rather than larger waste. Think of them as supporting cast to the isopods, not the primary cleanup mechanism.
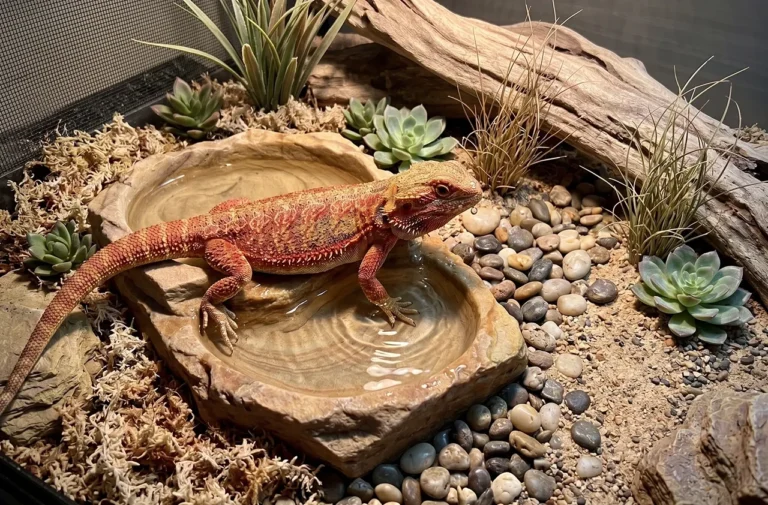
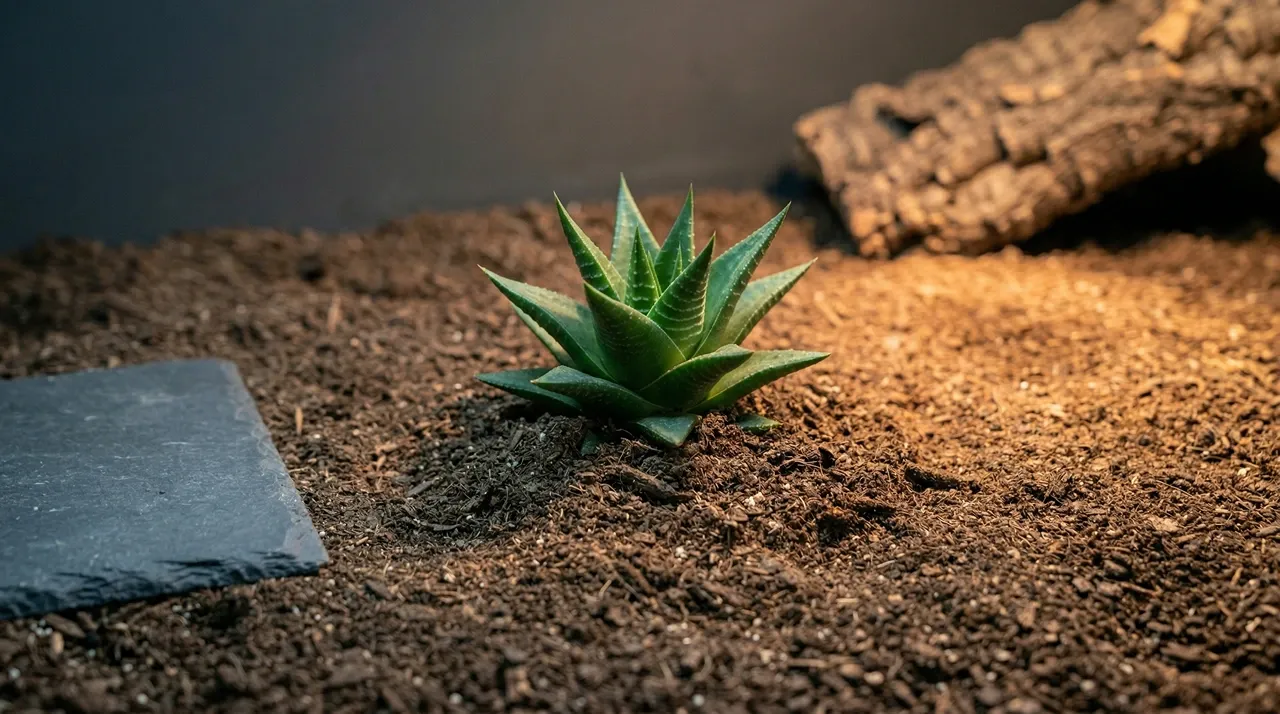
Plants That Survive a Beardie Enclosure
Most plants die in beardie bioactives for two reasons: the heat kills them, or the dragon does. Your basking zone surface hits 100 to 110°F, which eliminates anything not genuinely desert-adapted. Even on the cool end, ambient temperatures stay warm enough to stress plants that need regular watering.
Which Plants Actually Survive the Heat
The plants that consistently survive are:
- Haworthia species: tolerates heat, low watering frequency, and occasional nibbling without dying back
- Gasteria: similar resilience to haworthia, stays compact enough to avoid heavy trampling
- Aloe vera: safe for beardies in moderate amounts; grows back after grazing if roots are properly established
- Echeveria: handles heat well and grows slowly enough to survive light trampling
- Buffalo grass: works if your UVB output is strong enough; needs more light than most succulents to stay healthy
Beardies eat their plants regularly and with real enthusiasm. The safe plant species that also survive arid enclosure temperatures make up a shorter list than most general plant guides suggest.
Pot Your Plants Instead of Planting Direct
Planting directly into the substrate sounds logical but creates a practical problem. When your dragon tramples a plant, and they will, replacing it means digging through the substrate and disrupting the microfauna layer you’ve spent months building.
Potted plants in small terracotta pots buried to the rim solve this cleanly. You can pull and replace a plant in seconds without disturbing anything around it. Potting also lets you water plants independently of the enclosure’s moisture level, which matters when you’re actively keeping substrate humidity low.
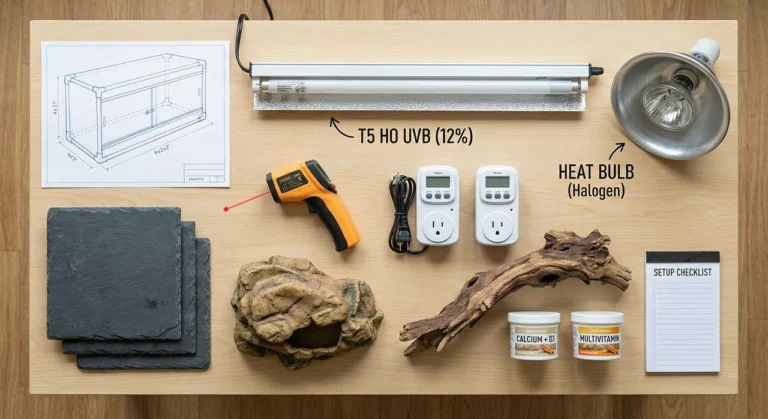
Your Lighting Setup Needs One Extra Thing
Your UVB and basking configuration stays identical to any other beardie enclosure:
- T5 HO UVB tube running at least half the enclosure length
- Halogen basking bulb providing 100 to 110°F at the surface
- Cool-end ambient of 80 to 85°F during the day
The complete beardie lighting setup, including placement distances, UVB schedules, and mesh considerations, applies unchanged here.
What bioactive adds is a plant-specific grow light. A basic LED grow strip run on the same 12 to 14 hour photoperiod as your UVB gives your succulents the light spectrum they need to stay healthy. Without it, even supposedly low-maintenance succulents will etiolate, stretching pale and thin, and die within two to three months despite looking fine initially.
What Maintenance Actually Looks Like
Bioactive enclosures are often described as self-cleaning, and that framing sets beginners up for disappointment. A well-established setup with a healthy isopod population will process waste far more efficiently than a bare enclosure, and spot cleaning becomes significantly less frequent after three to four months.
Solid waste, including urates and faecal matter, should still be spot-removed when visible, particularly in the first three months before the colony is large enough to handle it quickly. Dead feeder insects are less of a concern because the isopods will process them quickly. Localised mould from soft-bodied feeders or uneaten salad is worth removing when you see it.
Every three to six months, check your substrate depth. Organic matter being processed causes the level to drop gradually. Top up with fresh mixed substrate as needed, working it gently into the existing layer without disrupting the deeper microfauna zones.
A full substrate replacement should rarely be necessary. If you find yourself replacing substrate frequently, the cleanup crew isn’t establishing properly and something else needs addressing.
Supplementation Still Matters in a Bioactive Build
A common assumption is that a more natural environment reduces the need for calcium and vitamin supplementation. It doesn’t. Your dragon’s UVB-driven D3 synthesis and dietary calcium requirements are identical regardless of enclosure style.
The dusting schedule stays unchanged: calcium at most feedings for juveniles, three to four times a week for adults, with a multivitamin once or twice weekly. Bioactive substrate does not replace this.
One small adjustment worth making: avoid gut-loading feeder insects with high-moisture foods if they’re being released live into the enclosure. Insects that die before the cleanup crew reaches them decompose quickly and create localised humidity spikes around the carcass.
Is Bioactive Actually Less Work Than a Standard Setup
| Factor | Bioactive Setup | Standard Setup |
|---|---|---|
| Setup cost | Higher upfront (substrate, CUC, plants, grow light) | Lower upfront |
| Ongoing maintenance | Lower once established (3–4 months in) | Regular spot cleaning required |
| Suitable for babies | No. Impaction and parasite risk. | Yes. Tile or slate recommended. |
| Suitable for sick dragons | No. Use a sterile setup instead. | Yes. Waste is easier to monitor. |
| Humidity management | Active microclimate management required | Simpler. No CUC to consider. |
| Enrichment level | High. Digging, foraging, hunting CUC. | Moderate. Depends on décor. |
| Parasite risk | Higher if dragon not cleared first | Lower. Waste removed manually. |
| Minimum enclosure | 4 x 2 x 2 ft with 5–6 inch substrate depth | 4 x 2 x 2 ft standard |
What Most Beginners Want to Know Before Building
Can isopods hurt my bearded dragon?
Arid-adapted isopods like Porcellio laevis will not bite or harm your dragon. They are detritivores that eat dead organic matter, not living animals. Your dragon may eat a few, which is harmless, but isopods generally stay in the substrate and avoid large animals by instinct.
How long does it take for a bioactive setup to establish?
Expect three to four months before the cleanup crew population is large enough to reliably handle the biological load of an adult beardie. The first month carries the most die-off risk. Keep spot cleaning normally during this period and introduce the dragon no sooner than two weeks after the initial CUC release.
Do I still need to deep clean a bioactive enclosure?
Full substrate replacement is rarely necessary in a functional setup. The main recurring tasks are periodic substrate top-ups, direct misting of the humidity microclimate pockets, and occasional plant replacement. Full deep cleans destroy the microbial colony and CUC population you’ve spent months building.
What is the difference between arid and tropical bioactive?
Most online bioactive content is written for tropical setups. Here is what changes for an arid beardie build:
- Tropical: 60–80% humidity, drainage layer required, moisture-loving plants, tropical isopod species
- Arid (beardies): 30–40% humidity, no drainage layer needed, desert succulents, arid-adapted isopods
Before You Start Building
Work through this checklist before sourcing materials:
- Reptile vet fecal test completed and cleared
- Dragon is at least six months old and eating confidently
- Enclosure is at least 4 x 2 x 2 ft with a substrate dam
- Organic topsoil sourced with no fertilisers or wetting agents
- Play sand or pool filter sand sourced, washed and pesticide-free
- Excavator clay sourced
- Arid isopod species ordered, minimum 100 to 150 individuals
- Cork bark sourced for cool-end humidity microclimate
- Sphagnum moss sourced for the microclimate patch
- LED grow light ordered, same length as enclosure or longer
- Plants confirmed safe and pesticide-free before purchase
- Digital hygrometer positioned at cool-end substrate level
Build the enclosure, introduce the cleanup crew, and give the setup two to three weeks before your dragon goes in. That window lets the isopod population begin establishing and gives the substrate microbial layer time to develop before it takes on the full biological load of an adult beardie.
A bearded dragon bioactive setup done properly is genuinely lower maintenance than a bare enclosure once it’s running. The learning curve is real, but it’s front-loaded. After the first three to four months, the enclosure largely manages itself and gives your dragon the kind of sensory environment a tile floor simply cannot replicate.
Written by
Sarah ArdleySarah has kept bearded dragons for over ten years. She founded Beardie Husbandry after discovering that most mainstream care advice — including what she followed with her first dragon — was doing more harm than good. Every article on this site is grounded in veterinary research and real keeper experience.